
TL;DR
Open a free Amazon Business account
Business pricing, bulk buying and tax-exempt orders.
Create a free accountAs an affiliate, we earn on qualifying purchases.
You can convert a sturdy dresser into a diaper-changing station by adding a secure, waterproof pad and anchoring it to the wall. Proper organization and safety measures make it both practical and safe for your baby. This guide walks you through every step.
Imagine this: your tiny baby fusses, and you need to change a diaper—fast. Instead of cluttering your nursery with a dedicated changing table, you can repurpose a sturdy dresser. It’s space-efficient, budget-friendly, and looks great.
But before you stack wipes and creams, there’s a bit of setup involved. Proper safety, organization, and comfort are key. This guide walks you through turning your dresser into a safe, stylish changing station—so you’re ready for those midnight diaper changes, no sweat.
Secure your dresser to the wall with furniture straps to prevent tip-overs.
Choose a sturdy, flat-topped dresser around 36 inches tall for comfort and safety.
Use a waterproof, cushioned changing pad with raised sides for safety and comfort.
Organize supplies with small baskets and dividers for quick, easy access.
Pick a dresser that matches your nursery decor and is easy to wipe clean.
Why a dresser can be a safe, smart choice for a changing station
A dresser offers a flat, sturdy surface that can double as a changing table with the right modifications. When properly secured to the wall, it becomes a stable, space-saving spot for diaper changes. Plus, it’s easier to organize all your diapering essentials in a familiar piece of furniture that already fits your nursery style.
Unlike traditional changing tables, dressers don’t tip over easily if anchored correctly—making them safer for busy parents. They also grow with your child, so you’re not stuck with a piece of furniture you’ll outgrow.
However, it’s important to understand that not all dressers are inherently safe for this purpose. The key is in choosing a sturdy, well-built piece and ensuring it’s properly anchored. Failing to do so can lead to dangerous tip-overs, especially as your baby starts to stand or pull up, which can result in serious injuries. The benefits are significant, but safety always comes first.

JVEOO Waterproof Baby Changing Pad Wipeable Diaper Changing Mat
- Waterproof & Wipeable Surface: Prevents moisture seepage and easy to clean
- Non-Slip Base & Safety Strap: Ensures baby stays secure during changes
- Perfect Size & Portable Design: Fits standard tables and ideal for travel
As an affiliate, we earn on qualifying purchases.
As an affiliate, we earn on qualifying purchases.
How to choose the perfect dresser for a diaper-changing station
- Pick a sturdy dresser with a flat, smooth top. Look for rounded edges and a solid build—avoid anything wobbly.
- Ensure the height is comfortable for you—around 36 inches is ideal for most caregivers. Consider your own height and comfort to prevent back strain during frequent diaper changes.
- Check the weight capacity—your changing pad and baby will add weight, so stability matters. A heavier, solid wood dresser generally provides more stability and less wobbling, which is crucial for safety.
For example, a 36-inch tall, solid wood dresser with no wobbling is perfect. A dresser with deep drawers also helps store essentials without cluttering the top, but ensure the drawers are securely attached and won’t tip or slide out unexpectedly.
Remember, the right dresser isn’t just about looks; it must be durable, stable, and suitable for modification into a safe changing station. Investing in quality furniture reduces the risk of accidents and provides peace of mind.

Ougourim Furniture Anchors (10 Packs) Anti Tip Furniture Anchors for Baby Proofing, Furniture Wall Anchor Earthquake Straps for Furniture Dresser Wall Safety Anchor Furniture Fasteners to Wall, White
- Baby Safety Guard: Keeps furniture secure from children’s climbing
- Easy Installation: Quick setup with included hardware and tools
- Versatile Mounting: Supports vertical or horizontal installation
As an affiliate, we earn on qualifying purchases.
As an affiliate, we earn on qualifying purchases.
Securing your dresser to the wall — the safety step you can’t skip
Securing the dresser to the wall is the most critical safety step because it directly prevents tip-over accidents, which can cause severe injuries to your little one. Using furniture straps or brackets is a simple yet effective solution—these devices are designed to anchor furniture firmly to the wall, especially in homes with active babies or toddlers who may pull or stand on the furniture.
Attach the straps to the back of the dresser and anchor them into wall studs with screws—studs provide the strongest hold. If you attach the straps to drywall alone, the risk of failure increases significantly, so always locate and secure into studs.
This process might take 10-15 minutes, but the safety payoff is enormous. Properly secured furniture minimizes tipping risks during vigorous diaper changes or if your child pulls up on the dresser. Remember, even a seemingly stable piece can become dangerous if not anchored properly. Think of this step as the foundation of a safe changing station—skipping it is not an option.

ZenStortage 12Pack Drawer Organizers Clothes, Linen Nursery Drawer Divider
- Premium Cotton Linen Fabric: Natural, odor-free, breathable material
- 12-Piece Nursery Storage Set: Three sizes for various items
- Organized Drawer Transformation: Creates neat, accessible nursery drawers
As an affiliate, we earn on qualifying purchases.
As an affiliate, we earn on qualifying purchases.
Adding a waterproof changing pad — comfort + safety in one
A waterproof, cushioned changing pad is a must. It fits snugly on your dresser top, providing a soft surface that’s easy to clean. Look for one with raised sides to prevent your baby from rolling off, which adds an extra layer of safety. The waterproof feature is essential because it allows quick cleanup of any messes, reducing the risk of mold or bacteria buildup.
Attach non-slip pads underneath to keep it from sliding during use. The choice of pad size matters: a 16×32-inch pad with a waterproof cover and non-slip bottom ensures a secure, comfortable space for diapering. A good pad not only enhances safety by preventing slips but also provides comfort, making diaper changes less stressful for your baby and easier for you.
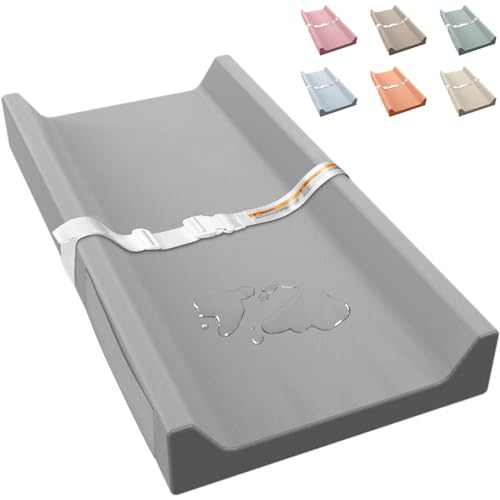
JVEOO Vegan Leather Baby Changing Pad Waterproof & Wipeable with Pockets
- Durable Waterproof Material: Made of easy-to-clean PU leather
- Soft and Skin-Friendly Surface: Provides gentle comfort for baby's skin
- Supportive Foam Padding: Ensures stability and safety during changes
As an affiliate, we earn on qualifying purchases.
As an affiliate, we earn on qualifying purchases.
Organizing your diapering supplies for quick access
Having everything you need within arm’s reach makes diaper changes smoother and reduces the risk of accidents caused by rushing. Use small baskets, drawer dividers, or caddies to separate wipes, creams, diapers, and clothing. Proper organization minimizes clutter, which can be a tripping hazard or cause delays during urgent diaper changes.
Designate specific spots for each item—keeping wipes and creams on a small tray on the corner of the dresser, with diapers in a nearby basket. This method not only saves precious seconds but also ensures everything is in its place, making cleanup and restocking easier. Well-organized supplies contribute to a calmer, more efficient diapering routine.
Design tips to make your dresser look great and feel functional
Your dresser can match your nursery decor while serving as a changing station. Choose a piece with a finish that’s easy to clean, like painted or laminate surfaces. Adding decorative elements like a fabric cover around the changing pad or colorful baskets can make the space more inviting and personalized.
Consider the balance between style and practicality: decorative baskets or covers should be durable and washable. A little effort in aesthetic details can make the changing area feel less clinical and more like a part of your nursery’s cozy atmosphere. This not only enhances the look but also encourages you to keep the space tidy and welcoming.
Real-world setup: turning your dresser into a safe, organized changing station
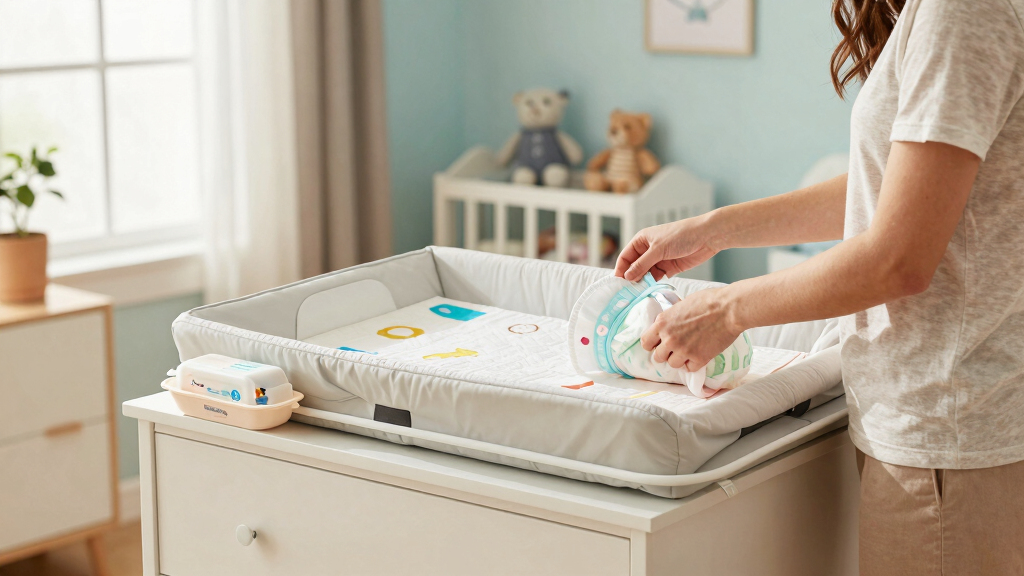
Imagine you’ve chosen a sturdy, 36-inch tall dresser made of solid wood. You anchor it securely to the wall, place a waterproof changing pad on top, and organize diapers, wipes, and creams in small baskets. Ensuring the dresser is stable and well-organized means you can focus entirely on caring for your baby without worry.
Proper setup involves not only anchoring but also thoughtful arrangement—placing frequently used items within easy reach and ensuring the changing pad is securely attached. This practical example highlights that with just a few adjustments, you can create a safe, efficient, and attractive diapering station that adapts to your growing child and your space constraints. The benefits include less clutter, more safety, and a more streamlined routine.
Frequently Asked Questions
Is it safe to use a dresser as a changing table?
Yes, if the dresser is sturdy, properly anchored to the wall, and fitted with a secure waterproof changing pad. Always supervise your baby during diaper changes.
How do I secure my dresser to the wall?
Use furniture straps or brackets designed for wall anchoring. Attach them to the back of the dresser and screw into wall studs for maximum stability—this reduces tip-over risk significantly.
What size changing pad should I buy?
Look for a pad that snugly fits your dresser top—typically around 16-20 inches wide and 32-36 inches long. Non-slip bottoms and raised sides add safety and comfort.
How can I keep diapering supplies organized?
Use small baskets, drawer dividers, or caddies. Keep essentials like wipes, creams, and diapers close at hand, and rotate frequently used items to reduce clutter.
Are there safety standards I should check for?
Look for dressers meeting ASTM or JPMA safety certifications and always secure furniture to the wall. Avoid dressers with sharp edges or unstable construction.
Conclusion
Turning your dresser into a diaper-changing station isn’t just a space-saver—it’s a smart, safe move that grows with your family. Focus on stability, organization, and comfort, and you’ll create a practical space that feels natural and secure.
Next time you’re mid-change at 3am, you’ll thank yourself for setting it up right. A good setup makes all the difference—less stress, more peace of mind.
College move-in / dorm season Picks
dorm essentials
As an affiliate, we earn on qualifying purchases.